SilcsBio Software Installation
Minimum hardware requirement
SilcsBio software requires relatively robust computational resources for the molecular dynamics (MD) components of the SILCS and SSFEP protocols. For example, computing SILCS FragMaps for a 35 kDa target protein takes 80-90 hours of walltime when run in parallel on ten compute nodes, each equipped with 8 3-GHz CPU cores. The software can take advantage of GPU acceleration: the addition of a single NVIDIA GeForce GTX 980 GPU to each node will reduce the walltime to 24-48 hours. In the case of SSFEP, walltime using these GPU-equipped nodes will be 3-4 hours.
SilcsBio software is designed to run the computationally-demanding MD on a cluster using a cluster queue management system such as OpenPBS, Sun Grid Engine, or SLURM. With both SILCS and SSFEP, subsequent evaluation of relative ligand affinities takes on the order of 10 minutes on a single CPU core, allowing for modifications to be rapidly evaluated on ordinary laptop or desktop computers. For customers without ready access to a computing cluster appropriate for the resource-intensive MD component, SilcsBio is able to perform these computations as a service and supply data to the customer for their subsequent in-house analysis. For this service, in the case of SILCS, SilcsBio requires only the structure of the target, and, in the case of SSFEP, only the structure of the protein-parent ligand complex. Depending on the choice of SSFEP or SILCS, no intellectual property in the form of proposed chemical modifications to the parent ligand or the parent ligand itself is required to be disclosed to SilcsBio. Alternatively, SilcsBio can assist customers with setting up their own virtual cluster using Amazon Web Services. Please contact info@silcsbio.com for additional information.
Software requirement
For SILCS FragMap generation and SSFEP calculations, the MD simulation package GROMACS is required. Although the SilcsBIo software is compatible GROMACS version later than 5.1.0, we recommend GROMACS version 2018.1. The package can be obtained at http://manual.gromacs.org/documentation/2018.1/download.html and must be installed before using the SilcsBio software package.
Below is a recommended sequence of commands for general installation of GROMACS (with GPU acceleration):
cd <GROMACS source directory>
mkdir build
cd build
cmake .. -DGMX_BUILD_OWN_FFTW=on \
  -DREGRESSIONTEST_DOWNLOAD=on \
  -DGMX_GPU=on \
  -DBUILD_SHARED_LIBS=off \
  -DGMX_PREFER_STATIC_LIBS=on \
  -DGMX_BUILD_SHARED_EXE=off \
  -DCMAKE_INSTALL_PREFIX=<GROMACS install location>
make
make install
If your compute nodes do not have GPUs, use the following command:
cd <GROMACS source directory>
mkdir build
cd build
cmake .. -DGMX_BUILD_OWN_FFTW=on \
  -DREGRESSIONTEST_DOWNLOAD=on \
  -DBUILD_SHARED_LIBS=off \
  -DGMX_PREFER_STATIC_LIBS=on \
  -DGMX_BUILD_SHARED_EXE=off \
  -DCMAKE_INSTALL_PREFIX=<GROMACS install location>
make
make install
Please refer to http://manual.gromacs.org/documentation/current/install-guide/index.html for more detailed instructions.
Installation
The SilcsBio software package is delivered as a password protected zip-compressed file. Unzip and place the files to an accessible location. The files have following structure
silcsbio/
  data/
  program/
  silcs/
  ssfep/
  templates/
    silcs/
    ssfep/
  plugins/
  examples/
The silcsbio folder contains software for running
SILCS and SSFEP simulations. The program, silcs, and ssfep
folders contain executable code, and the templates folder contains
templates for job submission and input scripts. Some template files will need
to be edited with information for your queuing system.
Uncompress and place the folders in an appropriate location. If you are a
system administrator, place the folder where it can be accessible by
other users, such as /opt/silcsbio/. If you are a single user, you may
place the folder in your home directory.
For SilcsBio software packages to work, the two shell environment variables
GMXDIR and SILCSBIO need to be set correctly. To do so, replace
<gromacs/bin> and <silcsbio> with the complete file paths for the
corresponding folders:
# bash
export GMXDIR=<gromacs/bin>
export SILCSBIODIR=<silcsbio>
Currently, the SilcsBio package is compatible only with Bash shell environment.
You may insert the above environment variable setting in .bashrc for
convenience.
Installing SilcsBio Graphical User Interface
SilcsBio Graphical User Interface (SilcsBio GUI) provides a streamlined user interface for running SILCS and SSFEP simulations as well as analyzing the results. Currently, Mac OS and Windows are supported. Please download and install the software on your local desktop or laptop computer.
While the SilcsBio GUI offers standalone features such as loading FragMaps or introducing ligand modifications, the SilcsBio GUI has the power to set up, initiate, manage, and analyze compute-intensive SILCS and SSFEP simulations. To enable this functionality requires a simple configuration step to allow SilcsBio GUI to communicate with your remote computing cluster. When you launch the GUI, select .

Within the “Settings” page, select the “Server” menu from the left-hand column. In the main panel, enter the “Server Name”, “Server Address” (IP address), “User name” for server login, and “SSH key”. If you do not have an SSH key for the server, leave it blank; the GUI will ask you the password to the remote server instead of using passwordless key login. Select the “Make Default Server” checkbox if you would like to set this server as your default server, causing this server to be selected as the default in other parts of the interface.
Enter SILCSBIODIR and GMXDIR information that matches the values selected in the previous section.

Once you have completed entering all values, click the “Save” button. The interface will test the connection and store the server information for your future use. Please contact support@silcsbio.com if you need help with this process.
Installing visualization plugins
Note
These plugins are used for visualization of FragMaps. If you are only interested in SSFEP, you may skip this section.
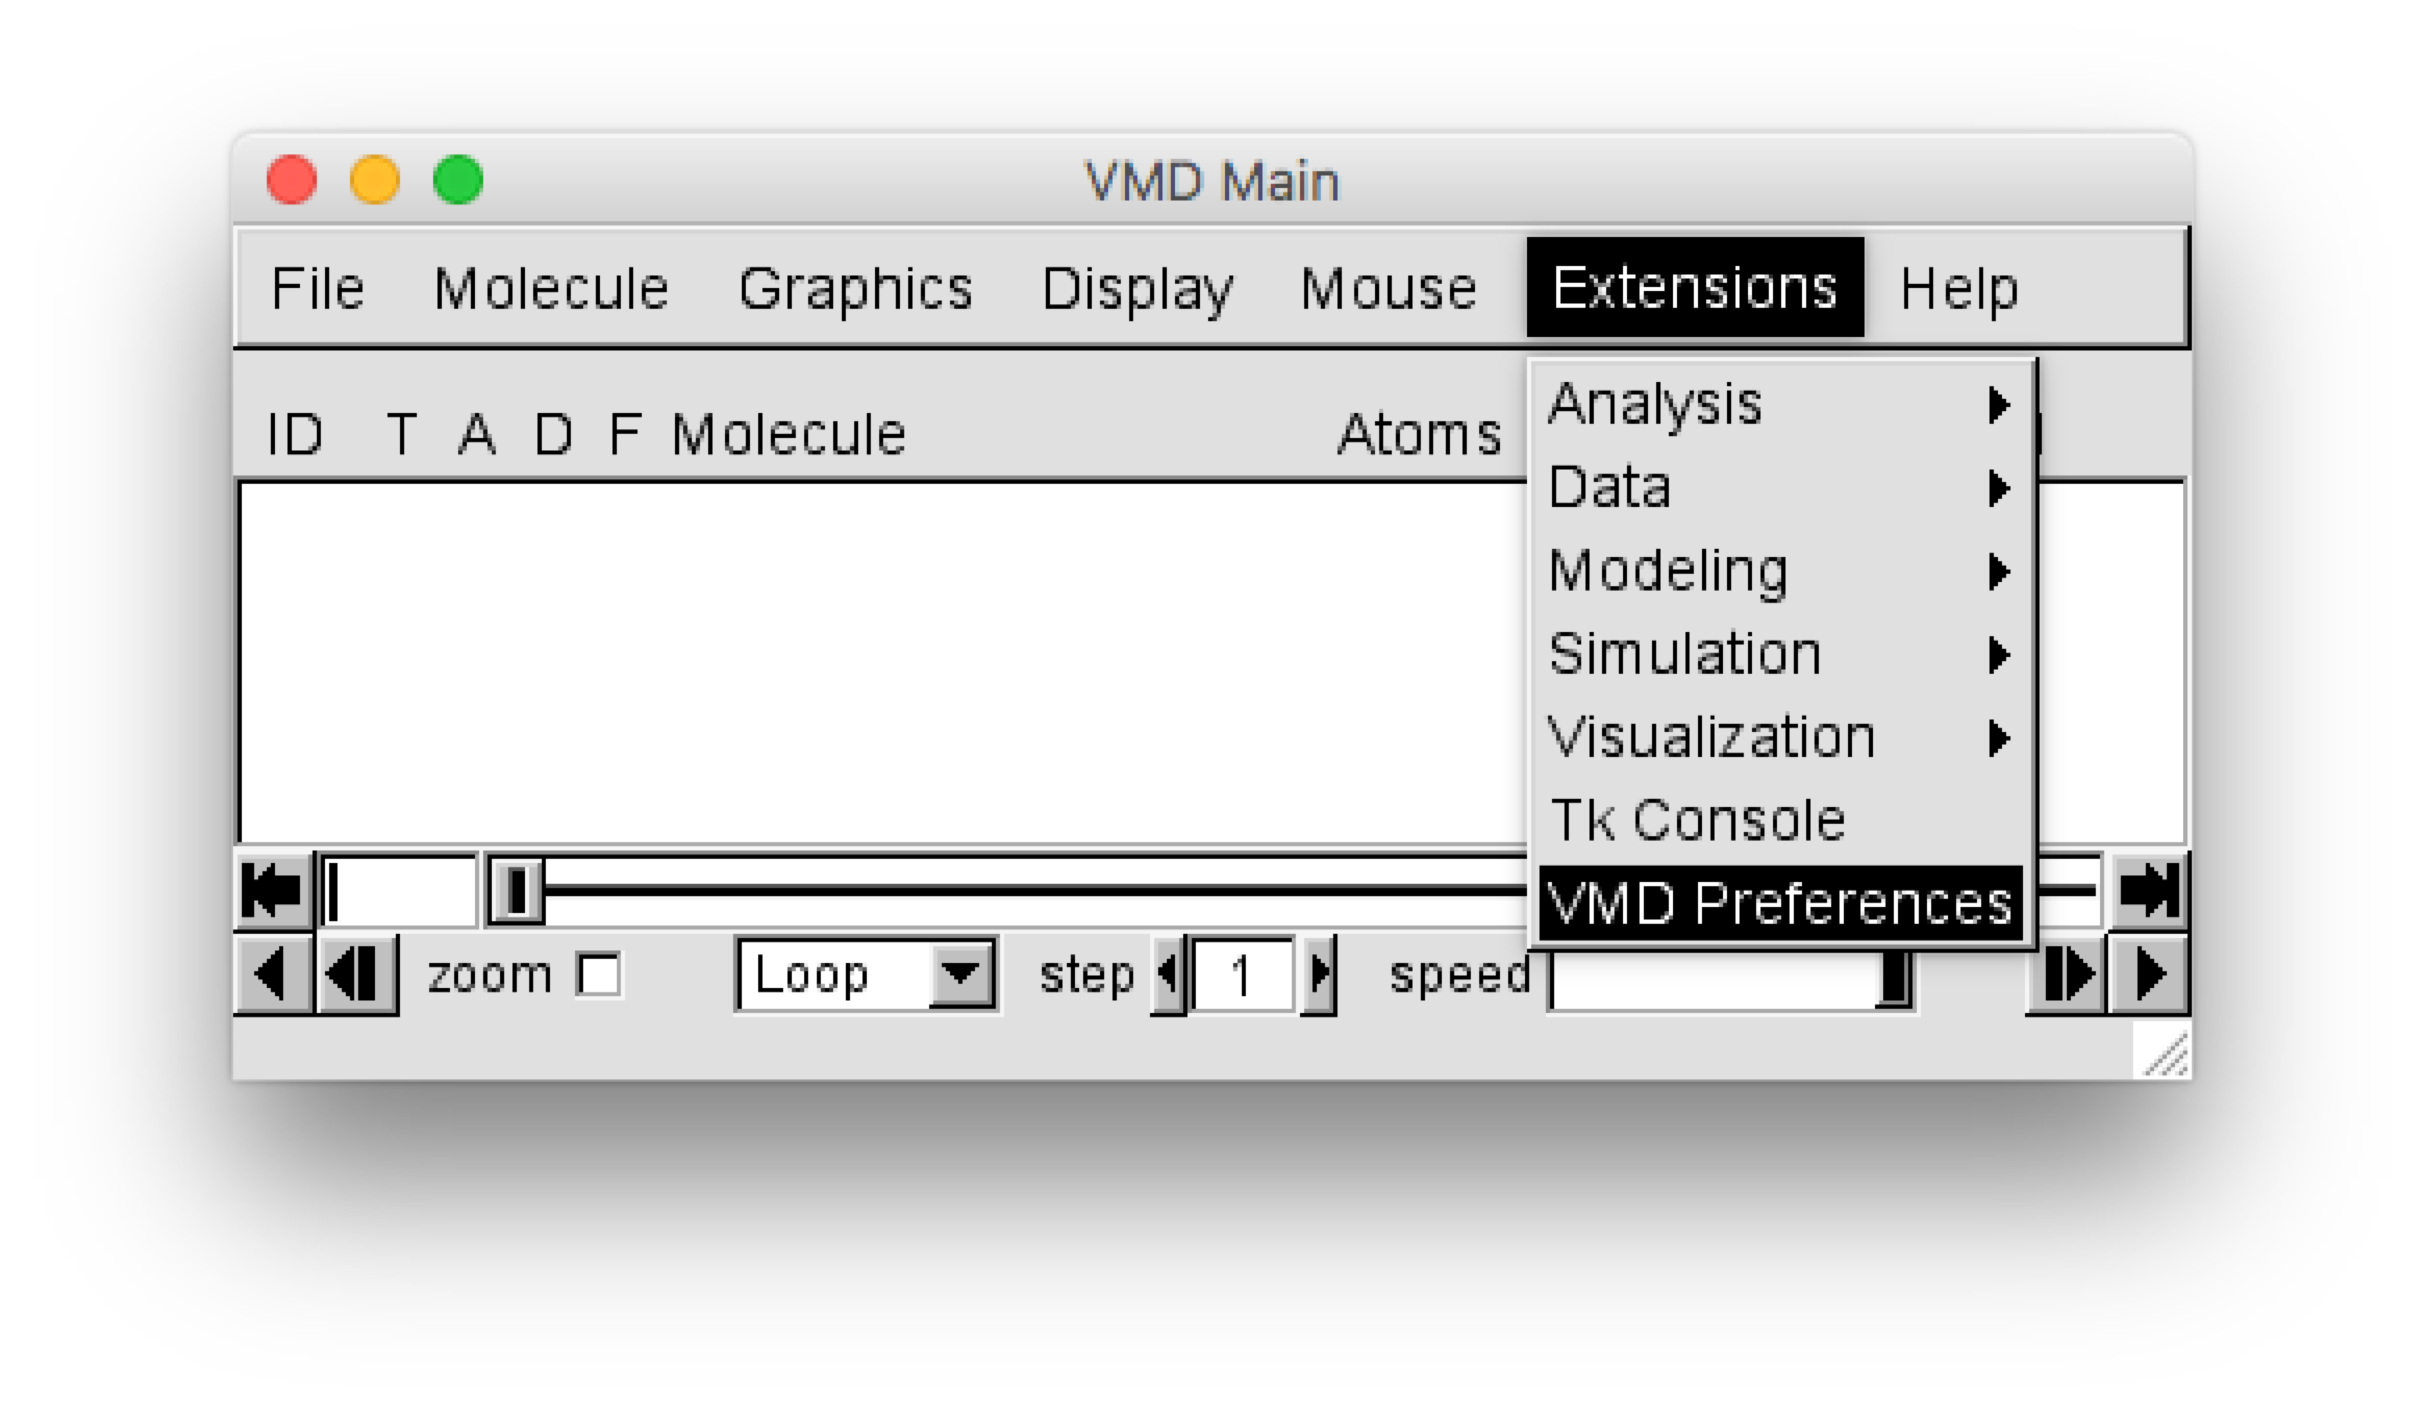
VMD plugin installation
For VMD versions later than 1.9, the plugin can be installed using the VMD Preference menu, which can be found in the “VMD Main” window using the menu selection :
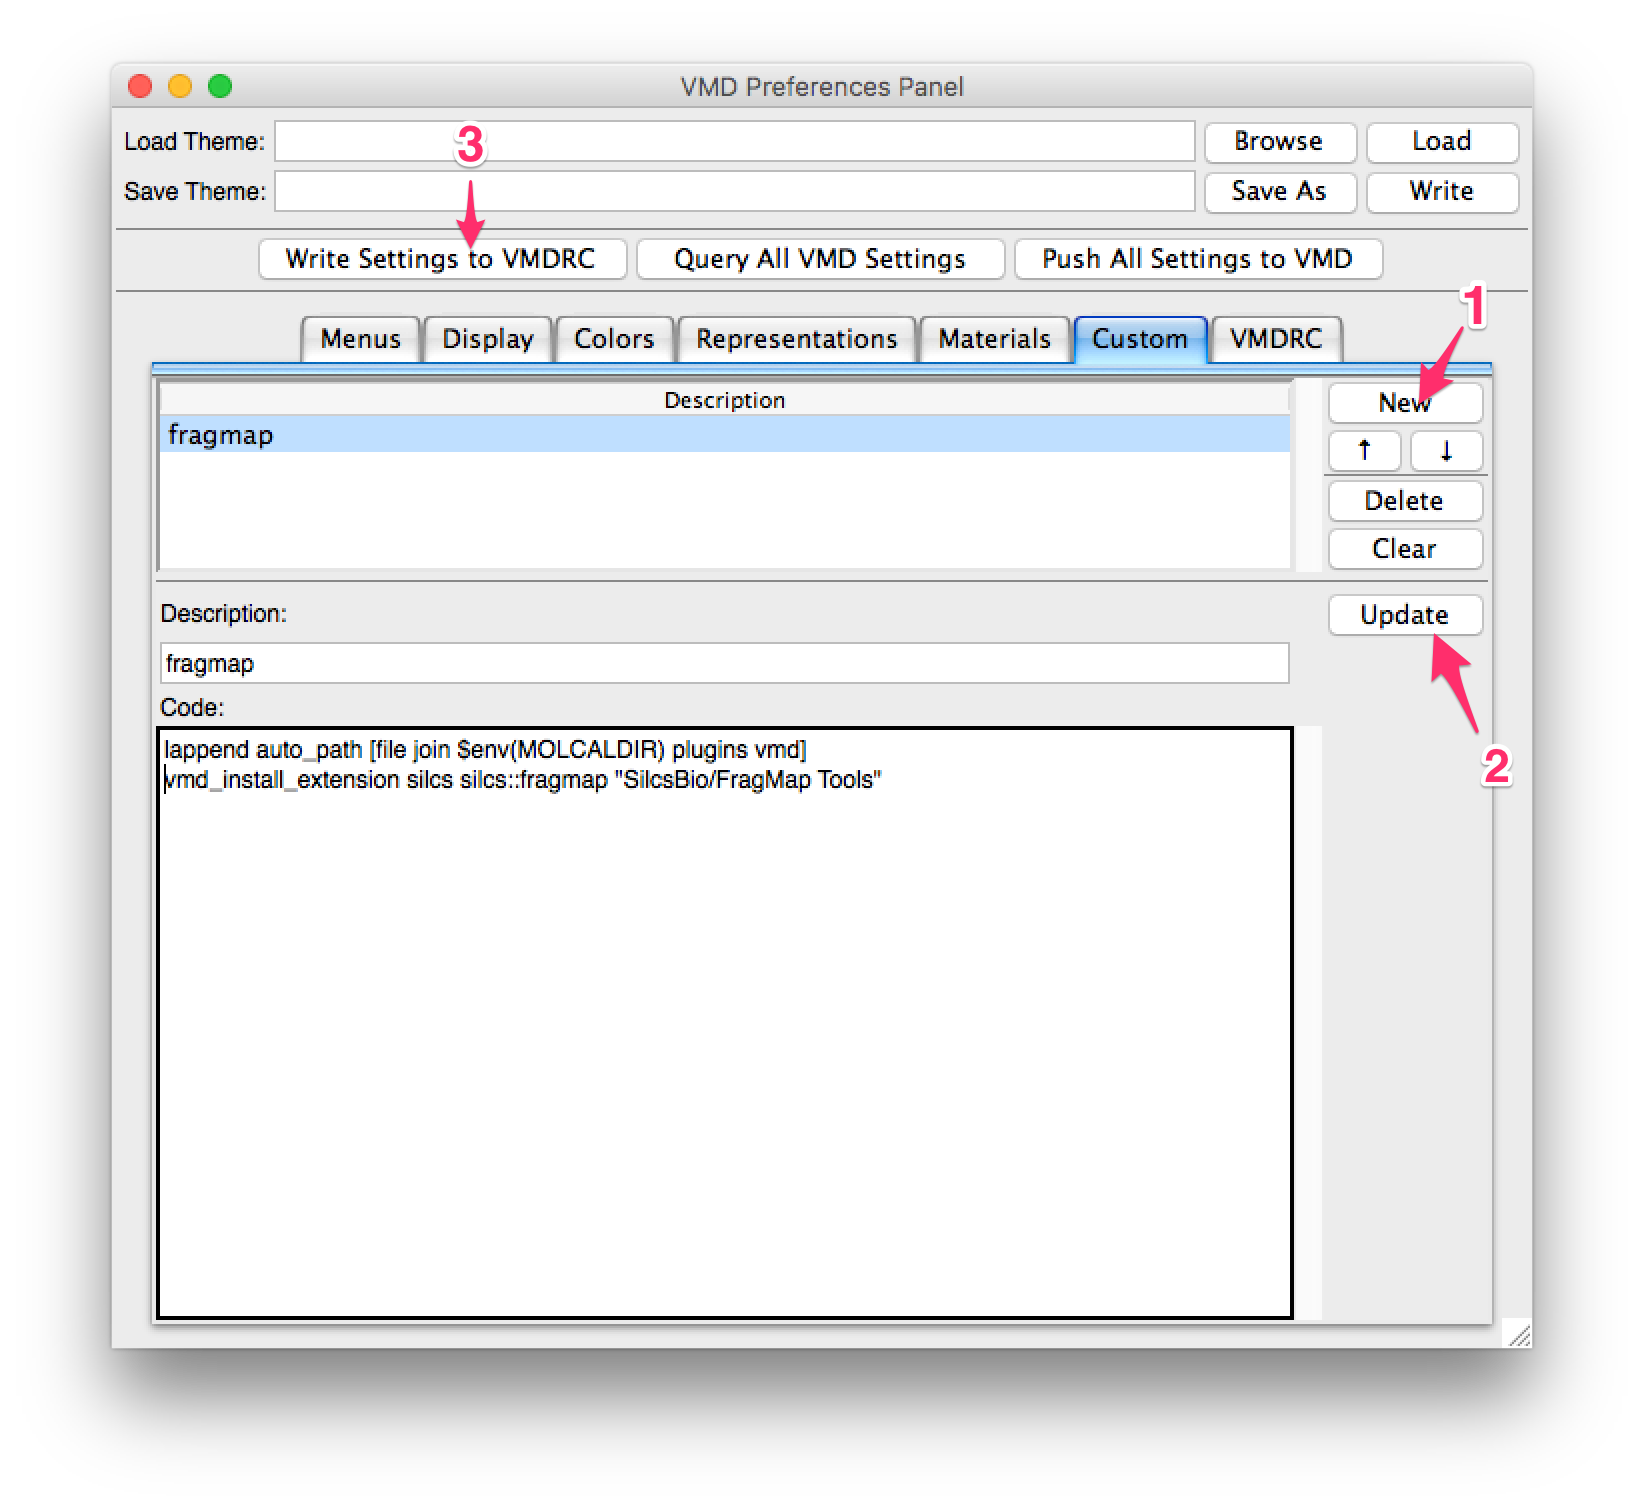
In the preference window, select the “Custom” tab and press the “New” button. Enter the following lines in the “Code” section:
lappend auto_path [file join $env(SILCSBIODIR) plugins vmd]
vmd_install_extension silcs silcs::fragmap "SilcsBio/FragMap Tools"
If you have not set the environment variable SILCSBIODIR, replace
$env(SILCSBIODIR) with the ful path to the silcsbio folder. Enter
an appropriate name for the plugin under “Description:”, then press
the “Update” button. Finally, press the “Write Settings to VMDRC” button and
then restart VMD to confirm the plugin installation.
PyMOL plugin installation
The PyMOL plugin can be installed using the plugin manager, which can be found using the PyMol menu selection :
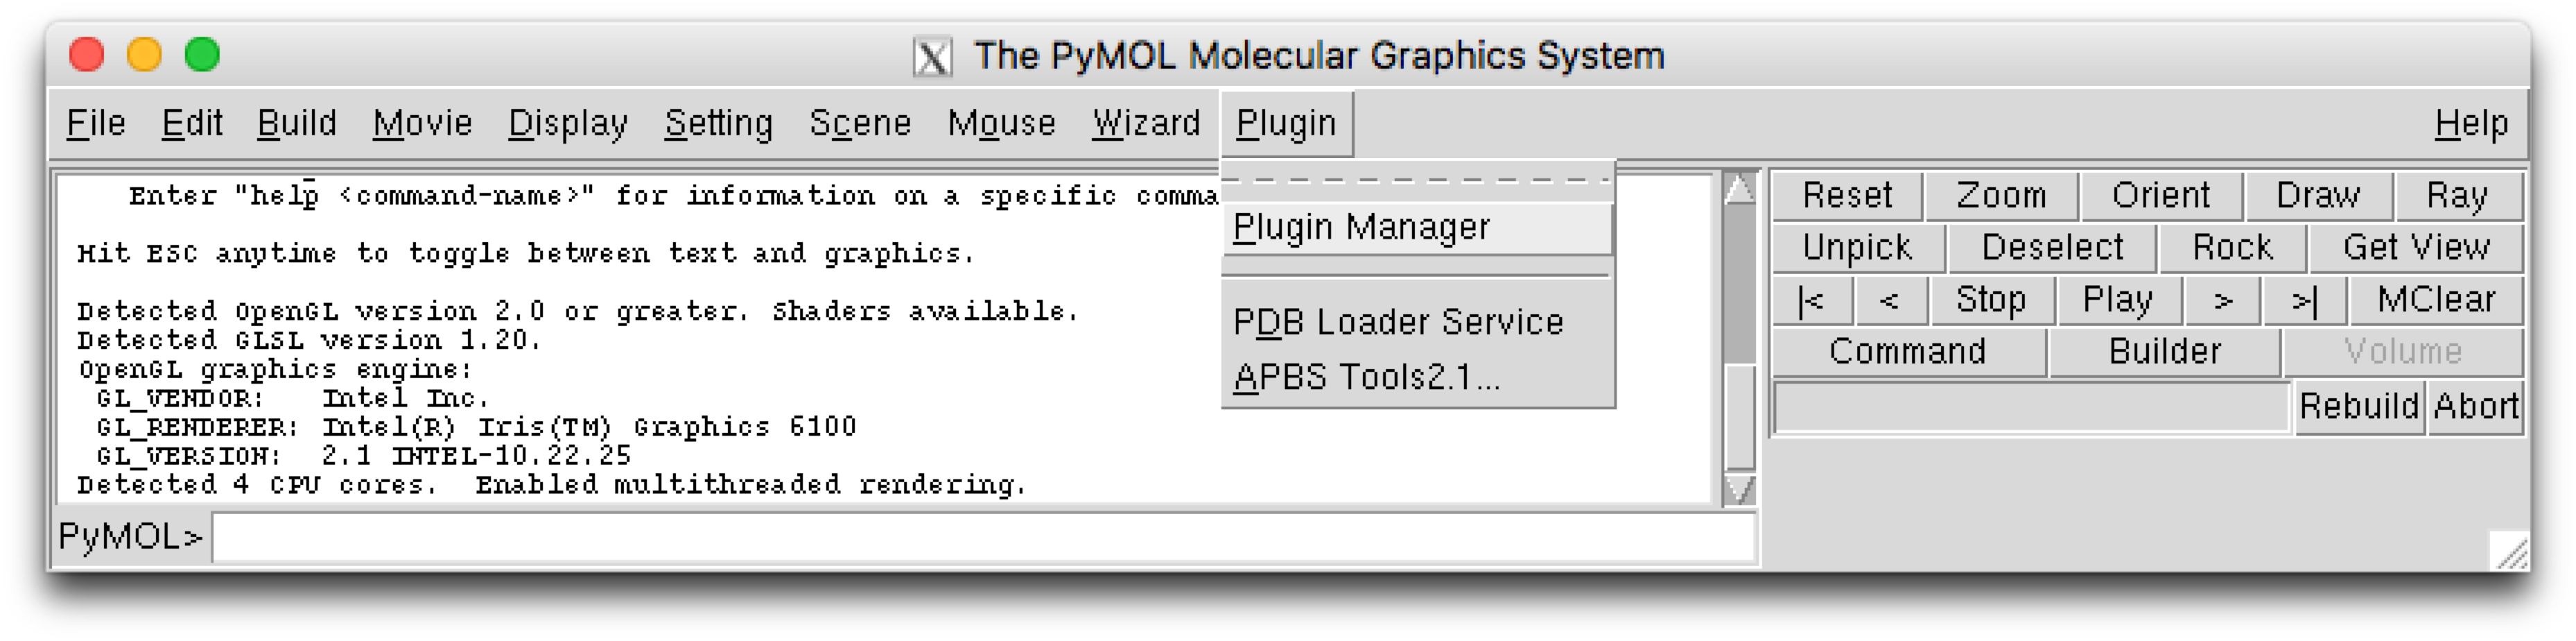
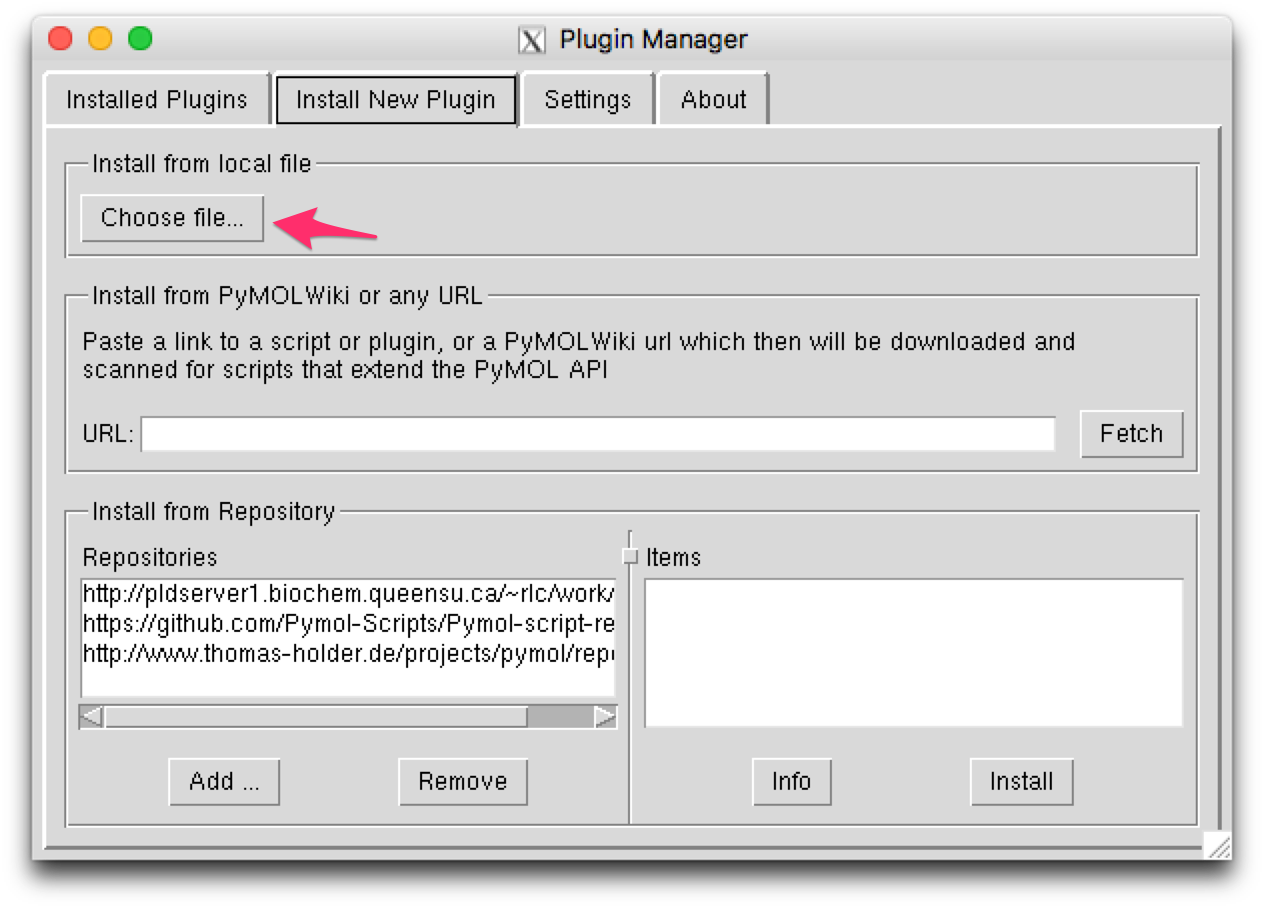
This will open a plugin manager window. Select the “Install New Plugin” tab.
Press the “Choose file…” button in the “Install from local file” section,
then select the location of silcsbio/plugins/pymol/fragmap_tools.py.
This will install the PyMOL plugin. Restart PyMOL to confirm the installation.